Tutorial: How to sew a fagoted seam
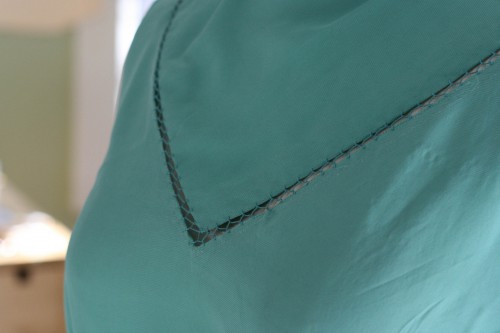
A fagoted seam is a decorative seam that joins two pieces of fabric together with a space between them and a row of hand stitching. It’s a very pretty detail seen most often in vintage clothing. It’s easy to incorporate this kind of seam into any patterns you make that have a yoke, or any other simple seam.
In this case, I’m making a silk blouse with a V-shaped yoke. So the two pieces fit together, forming a V-shaped seam. For the hand stitches, I used some perle cotton that matched my fabric, but you could use embroidery floss, heavy silk thread, maybe even very narrow silk embroidery ribbon.
Here’s what you’ll need:
- two pieces you’d like to join together
- heavy thread or embroidery floss for hand stitches
- hand sewing embroidery needle
- a piece of paper large enough to lay your pieces on
- a pencil
- a ruler
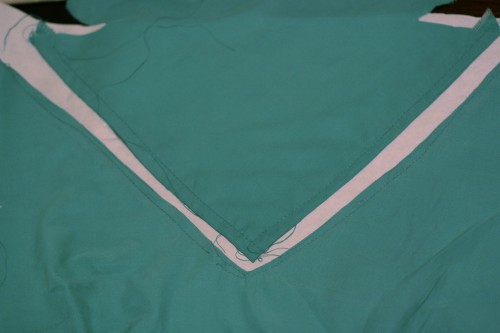
The first step is to turn the seam allowance under on each side of the seam. To do this, staystitch 5/8″ from the edge (or whatever width your seam allowance is), using a long stitch length. Turn the allowance down along this row of stitching and press. Machine baste the seams in place. Now you should have a couple of neat edges to stitch together.

Now use your ruler and pencil to draw your seam on the paper. In this case, I wanted a seam that had a 3/8″ gap between the pieces.
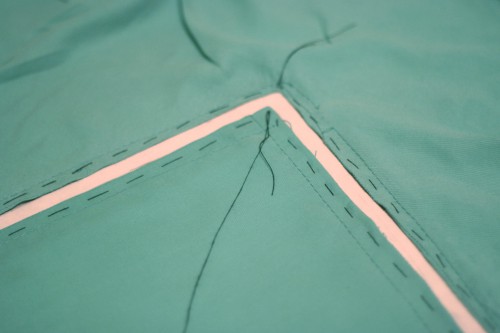
Lay your pieces over the seam you just drew and align the edges with your lines. Hand baste your pieces to the paper. The paper will insure that your seam is kept even.

Using your floss and hand embroidery needle, stitch the edges together using the fagot stitch. Don’t sew through the paper.
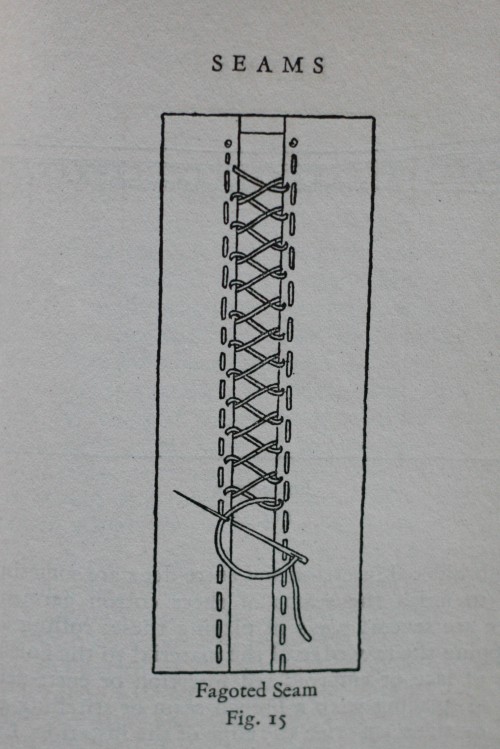
Here’s a diagram of how to do the fagot stitch, from one of my vintage books from the 1920s. It may take a little fiddling to get it right, but it’s a pretty simple stitch once you get going. Try to keep your tension even as you go.
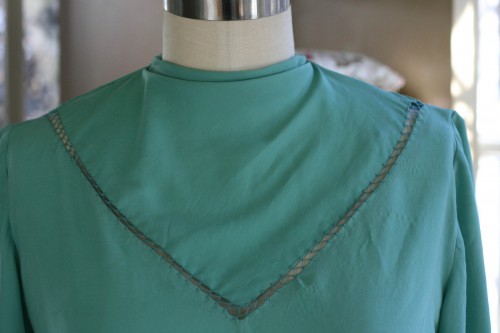
Remove all of your basting stitches and the staystitching, and your seam is complete!
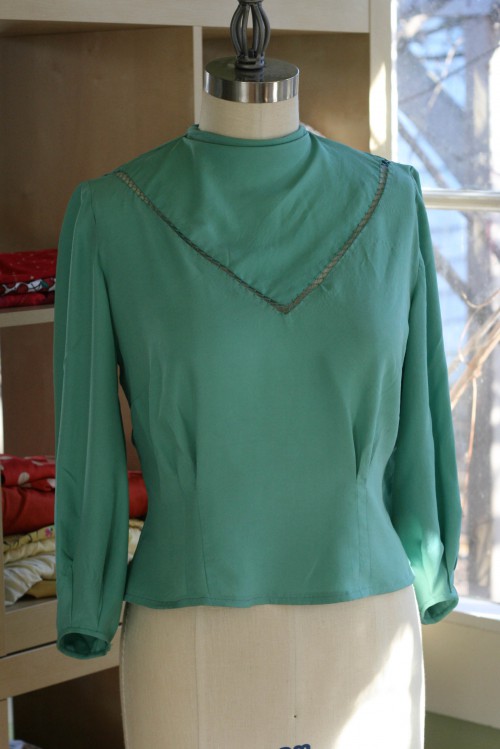
Here’s a shot of my finished blouse, so you can see the seam in context. Pretty, no?
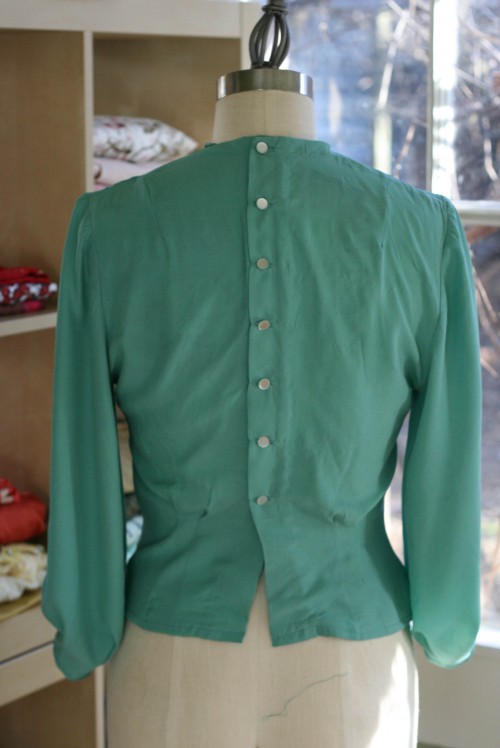
And a bonus shot of the back. I couldn’t resist those pearly buttons on this vibrant silk! The silk is a bit sueded, it’s the softest fabric ever.
Let me know if you have questions or any other ideas about using this stitch! I think it would also look lovely with a bit of delicate lace or mesh behind it, or maybe even a contrasting fabric.

 Sign In

Comments
Ceka
December 14, 2009 #
The stitch is so pretty!
I have a question about step 1. How do you turn the seam allowance down without bunching up the fabric at the bottom of the V neck? Do you trim some of the excess fabric from the corner and then turn it down, or just smoosh it under as well as you can?
clare
December 14, 2009 #
exquisite! and a really clear, de-mystifying tutorial. thanks – I’ll be referring back to this one.
Anne Weaver
December 14, 2009 #
This is absolutely divine! As soon as I can clear away my Christmas sewing and school work and housework enough to sew a project for myself, I’m definitely going to give this a whirl!
I linked to your tutorial on Craft Gossip Sewing: http://sewing.craftgossip.com/tutorial-use-a-fagoted-seam-to-join-fabric-pieces/2009/12/14/
–Anne
Heather
December 14, 2009 #
Just lovely!
jaime
December 14, 2009 #
Beautiful handwork!
Sunni Standing
December 14, 2009 #
So stunning! I simply can not wait to try this! Thank you so much for the tutorial!
Adelaide B
December 14, 2009 #
Very lovely. Thanks so much!
Casey
December 14, 2009 #
Oh wow–this is fantastic! I have always thought fagoting was so pretty, but figured it was a total pain in the butt to do. So now that I know the secret (basting to the paper), I can’t wait to try it! Thanks for the sewing inspiration!
Sarai
December 15, 2009 #
I’m glad you all liked it!
Ceka, I think you’re referring to the upper seam of the V, correct me if I’m wrong. There are a couple ways you could do it. One is a mitered corner (which I hope to do a tutorial on soon). But I just folded down one of the edges, pressed it, and folded the other edge over it. I basted it this way, then the fagot stitches hold it in place.
Ceka
December 15, 2009 #
Thanks, Sarai! I meant to ask about the lower seam of the V.
Sarai
December 17, 2009 #
Ah, the lower seam! You just have to clip that corner before you fold it down. The staystitching stitches will help reinforce the corner.
Just take your scissors and do one snip in the corner of the seam allowance almost to the stitching line, then fold. If you’re doing a seam like this without the staystitching, just reinforce the corner with some stitching before you clip.
M
December 21, 2009 #
Many heirloom stitches, including faggoting, can be done by machine and you can’t even tell the difference most of the time.
Tuppence
December 28, 2009 #
I never heard of/thought of hand basting it to paper to hold it in place. Thank you!!!! You took the frustration and failure out of the equation for me!
Maylo Harding
January 10, 2010 #
I thought you might like to know that this stitch was part of a solution to a murder mystery on “Poirot: Hickory Dickory Dock” with David Suchet. It is a great idea to use a unique stitch in a mystery, and this one especially, since it’s so memorable. Thanks for sharing.
You can rent the movie on Netflix.
Sarai
January 10, 2010 #
Maylo, that’s so cool! I grew up watching Poirot movies on PBS, maybe I’ll check this one out! It would be great to revisit them.
Cleo
January 11, 2010 #
Gorgeous!
Karen
January 12, 2010 #
Very nice! Can you also tell me what kind of darts those are in the front, and where you learned to make them? I like how you did them, and I’m learning to sew, and that’s one most basic base I don’t have covered yet!
Sarai
January 12, 2010 #
Hi Karen, that is called a tuck. It’s similar to a dart, except that it doesn’t come to a point at the end. You just stitch from one end to the other, and this will result in some fullness puffing out at the top of the tuck. To finish it, you just tie it off. Simply use a seam ripper to unpick the last stitch so that both pieces of thread are on the same side. Then tie the two pieces of thread together. Maybe I will do a tutorial on these things!
Pyleic
January 14, 2010 #
This is the internet, I have to say it, it’s practically a law.. What is this fagotry?!
Really though, it’s very very nice!
mizah
January 26, 2010 #
hye! i’m from malaysia..
i really love this one!!
thnks for your sharing..
i’ll try it… oh! can’t wait.. =)
Petal
August 8, 2010 #
My machine will also do a fagot stitch, but I bet it is not a pretty as when done by hand. Thank you for sharing this tutorial. I will try this and I will play around with my machine’s version just out of curiosity.
Jeisa
May 13, 2011 #
Boa tarde, se possível enviar resposta com preço.
Obrigada, Jeisa
Orçamento de 15 coletes para brigada de Incêndio, com as seguintes
características:
* Cor vermelha;
* Na parte de trás escrita silkada na cor branca (BRIGADA DE INCÊNDIO
– DATAPREV – MG);
* Na parte da frente silk do logotipo da brigada de incêndio (fundo
branco em volta do logotipo), e também 4 bolsos com pelo menos 20 cm de
altura e com velcro na parte de cima;
* 1 elástico em cada lateral;
* Material: Brim leve, oxford ou outro que acharem mais adequado.
Modelo do colete em anexo a este e-mail.
<>
zilredloh
June 16, 2011 #
Once you remove the machine basting stitches from the blouse (not the ones to the paper), how do you keep the seam allowances from flipping down into the open space of the fagotting? Or do they just stay in place from ironing?
Also do you keep the stay stitching in the blouse or is that ever removed?
Thanks! Can you tell I’m debating using this technique?!
Sarai
June 16, 2011 #
The seam allowances stay in place from both the pressing and the fagot stitch holding them in place. They don’t flip into the opening at all.
You can remove the staystitching once you’re done. I will edit to add that in, thanks for the excellent question!
zilredloh
June 16, 2011 #
Thanks so much!
Rebecca
March 4, 2012 #
Did you draft the pattern yourself for this? It’s gorgeous – particularly the neckline at the front.
Sarai
March 5, 2012 #
This one is a vintage pattern, from the 1940s. It is a very lovely shape, isn’t it?
Rebecca
March 9, 2012 #
The V at the front and the neck line together look almost like a silk scarf has been tailored into the blouse. I assume it’s just a kind of tiny cowl that forms the neck line??
Everything about it is lovely though!
Kathryn
May 12, 2012 #
Just beautiful! Just curious, what is the name of the book you have from the 1920s?
Thank you doll!<3
Womble
September 29, 2013 #
I have yet to see anyone use any of the other insertion or fagotting stitches on garments like this. Have you tried any others? This is obviously the simplest, but I have been meaning to try buttonhole insertion stitch on a garment, and my book of stitches includes a good half dozen alternatives.
Claudia
June 20, 2014 #
just recently found some lovely vintage collar patterns using fagoting but it’s a strait stitch instead of a slanted stitch and uses bias tape shaped into patterns and then attached to each other with this strait fagoting stitch. really beautiful! Also saw a video on utube where freezer paper was ironed onto fabric with a stitch guideline used to make stitching easier. When finished, the paper just peels right off.