
 Sign In

How our sewing patterns are made
I’m a very process-oriented person.
Yes, it would be nice to be brilliant, creative, responsible, detail-oriented, alert, articulate… and to be that way all the time. But in the real world, we are all human. We all make mistakes, forget to pay attention, or have trouble digging up new ideas.
That’s when I find it helpful to have a method to your madness, whether it be a fun endeavor like sewing or something more complex, like developing a product. What do you think? Are you all about having a solid process?
Today, I wanted to share a condensed version of our design process here at Colette Patterns. If you’ve ever wondered how a sewing pattern is developed (not necessarily drafted, which is a whole other topic), I’m here to share our method, using Hawthorn as an example. I’m sure there are many ways to go about this. Our process was cobbled together from both the world of apparel design and my own background in User Experience.
Step 1: Inspiration
The very first thing we do is figure out what type of garment we’re going to design.
There are a lot of factors there. We think about the types of things you guys have requested, what we need more of in the collection as a whole, the season, variations we can provide, fabric choices, and the difficulty level. A lot of this is intuitive, just a lot of throwing ideas out there.
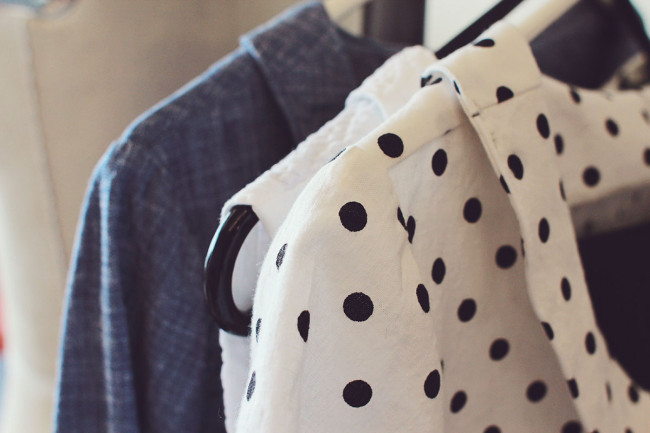
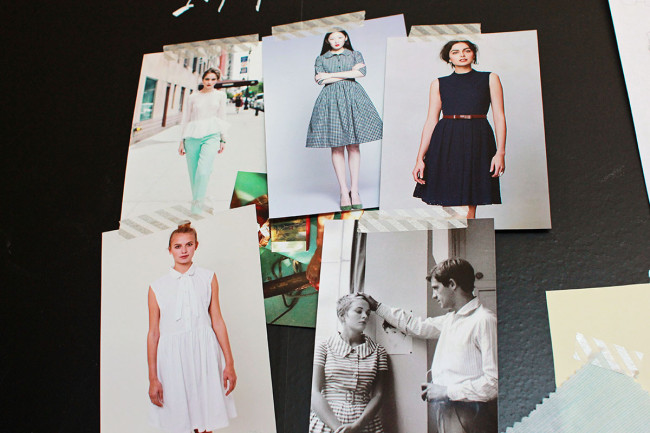
From there, we might collect some images to get a sense of the overall mood or lines. These are a few images that got us inspired, with a vintage gamine feel to them.
Step 2: Sketching
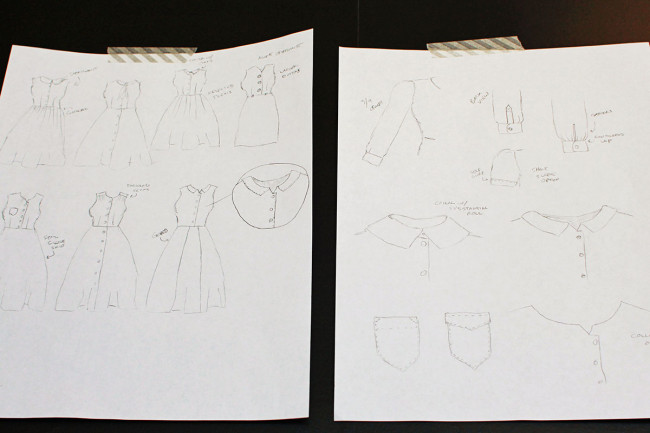
We might do some sketching at first to work out ideas, but at this point we’ll move into more of the details. Lots of sketches, lots of iteration and talking.
Step 3: Final sketches
At this point, we’ll finalize the sketches and variations.
Step 4: Spec
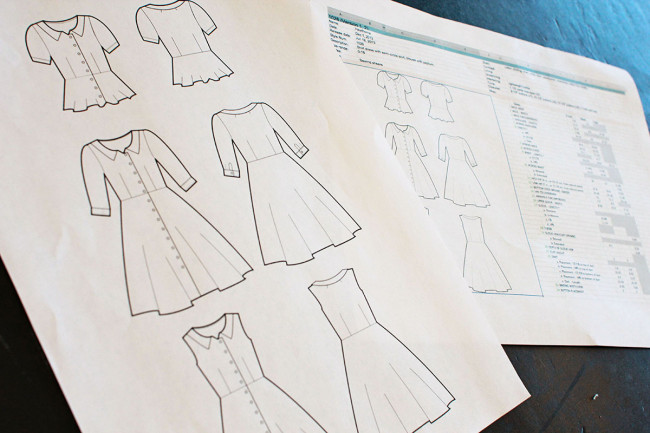
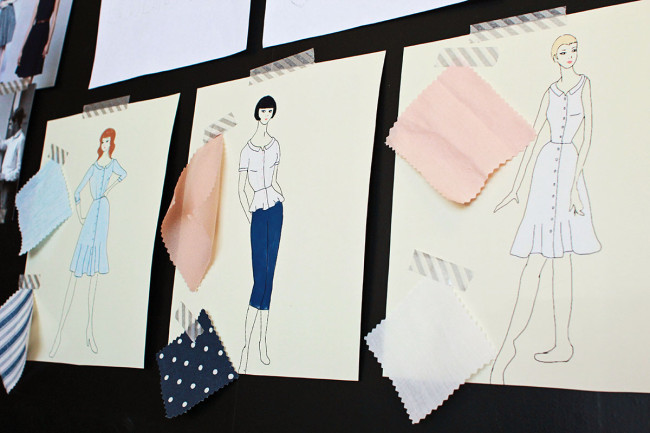
Next, it’s time to create some flats and a spec. The flats are the technical illustrations you see on the pattern, and they show the style lines of the final garment, including the placement of details, closures, seams, and darts.
The spec is a document that specifies the measurements of the garment, along with the materials required and other important notes. This is our base document that we can refer back to as we create, fit, and modify the pattern.
Step 5: Drafting and Fitting
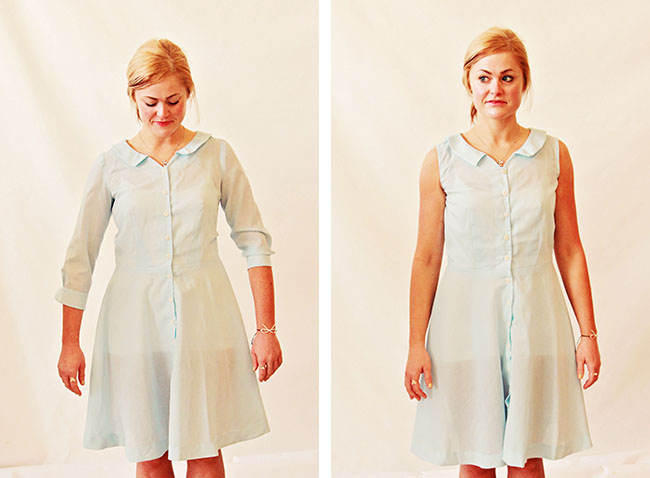
This is one of the more time consuming parts of the process.
Kristen drafts the pattern and begins making some fit samples. We’ll sew up all of the variations in our base size, and finally bring in our fit model.
Although we might do an initial fitting using just a dress form, it’s very important to get a real live human in to try on the samples for fitting. This way, we can see how it looks on a real live squishy woman, and we can check to see how it feels on her and how well she can move around in it. We’ll have her do a few different movements, like extending and raising her arms or sitting down.
We take photos from different angles for reference, and might bring her back in for another round after we adjust the pattern. Some patterns definitely require more fitting than others.
Step 6: Testing
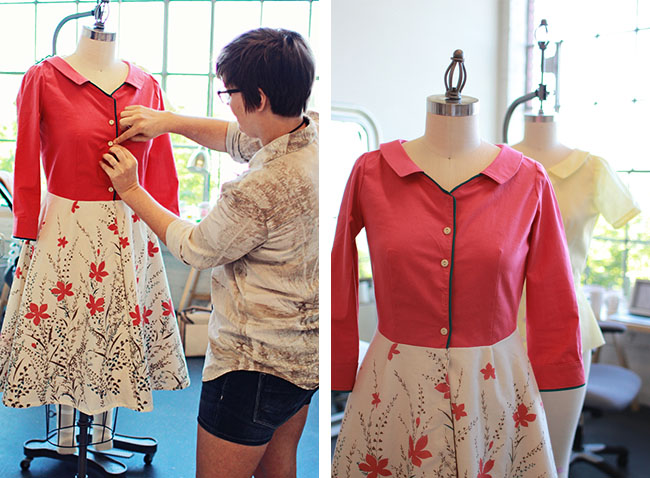
Once the pattern is ready to go, Kristen works on the technical illustrations and writing. As you can tell, Kristen does a huge amount of work on the patterns, while I take more of an editorial role. Having a good process in place is what let me place a lot of the technical work into her capable hands, while still maintaining a consistent style.
Ok. Now the pattern is close to being done, or so it seems.
Our next step is to have some regular sewists test it out. We give them both the pattern and the instructions and collect structured feedback on every single page.
When they’re done, we ask them to stop by our studio to show us what they made and discuss any issues or problems they had. The photo above shows Kristen examining a version of Hawthorn made by one of our testers.
Step 7: Editing

Now we get into the final editing stage. We run through a whole editing process, sometimes multiple times. We check and recheck numbers, formatting, and look for typos. Once it’s pretty well done, we send it over to an experienced, professional editor for proofreading and copyediting.
Once we implement her changes, we are ready for print!
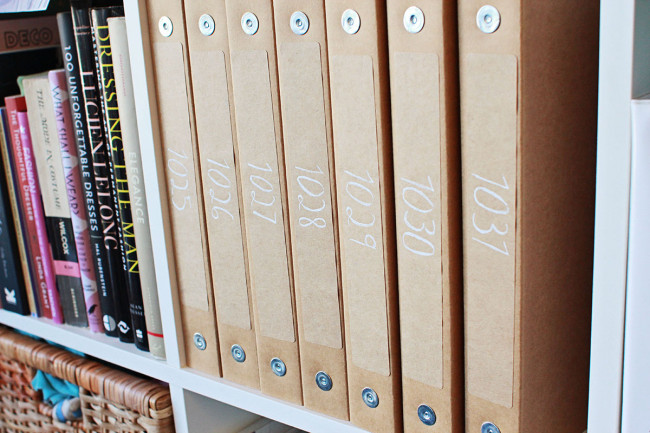
We keep all of our notes and documentation in these handy labeled binders for each design. The whole process takes 3-4 months, since we work on different stages of different patterns simultaneously.
Comments
Rachel
July 26, 2013 #
This is so interesting and inspiring. Thanks for sharing.
Emilie LG
July 26, 2013 #
Thanks a lot for sharing the backstage with us !
It’s very interesting, and we can never imagine how much work and time it takes to launch a new pattern.
Lisa G.
July 26, 2013 #
Very interesting; thank you. “Vintage gamine” – very right-on!
Lisa S.
July 26, 2013 #
What an interesting post! That red and print dress in the photo is gorgeous!
Tessa
July 26, 2013 #
I love the peek behind the curtain. I also love the Hawthorn made by a tester! The black piping and that contrast skirt are a great combination.
Lorenna
July 26, 2013 #
This was a great post! Thanks for the little glimpse into the gears of Colette Patterns!
Helen
July 26, 2013 #
THis is really interesting. Thank you for sharing. I do envy your ability to do this. It seems like the perfect job, in the most beautiful surroundings! Lucky you!
mjb
July 26, 2013 #
Great post! Thanks for sharing this insight.
Diane @ Vintage Zest
July 26, 2013 #
Wow! I’m definitely impressed with the final patterns and now I can see why you have such beautiful garments resulting from them! By the way, I love that you mention how you need to see the first test on a “live squishy woman” because, yes, I do like being able to raise my arm in a dress!
Connie | Daydream In Color
July 26, 2013 #
That’s amazing! So much hard work goes into each pattern.
Rachel W.
July 26, 2013 #
Oooh, thank you so much for giving us a glimpse of the patternmaking timeline. I knew, theoretically, that the whole deal involved lots of drafting and samples and fitting, but it’s especially illuminating to see the process behind one of my favorite pattern companies!
Kim
July 26, 2013 #
I love to see all the things that go into developing a pattern! Very interesting post :) thanks!
Louise
July 26, 2013 #
Thank you for this, so fascinating to see the process and work that goes into your beautiful patterns. And it clearly works, my Beignet skirt is the single best fitting skirt I have ever had – and my second real project using patterns. More than a little jealous this is not my day job too!
Mads
July 26, 2013 #
This was a really cool post–thanks for sharing it with us!
h
July 26, 2013 #
where are the, “handy labeled binders” from- i love the kraft look of them
Sarai
July 26, 2013 #
They are recycled binders from Guided: http://www.guidedproducts.com/
Kimber Crow
July 26, 2013 #
Thanks so much for this wonderful peek behind the curtain. My little girls enjoyed it as much as I did!!
Wanett
July 26, 2013 #
I love this little glimpse into your process!!! Small businesses are so fascinating to me.
Alyson Clair
July 26, 2013 #
Hey! I know your model. Is that Mary K?
Sarai
July 26, 2013 #
Yes, that is Mary!
Heather
July 26, 2013 #
Tessa beat me to it! I wasn’t sure about buying Hawthorn but that dress has decided it for me, it’s gorgeous. I would have never thought of using the fabrics like that by myself. Ah, I’m daydreaming about future outfits for work now…
I think this is probably my favourite post so far. I’m also jealous that this isn’t my day job, although I do spend my days teaching kids to sew up things like plushies and mobile phone cases – and telling them not to ‘rev up’ the machine! It’s fun, in a different way :)
I don’t usually post as I’m a rambler but just wanted to say thanks for the insight and inspiration.
Carla
July 26, 2013 #
Thank you for that! I’ve always been curious as to how it was done. Now I’m even more excited for my patternmaking class this fall
Michelle Woods
July 26, 2013 #
I love behind the scenes posts! Thanks for sharing the process behind the patterns- its something I know absolutely nothing about so its been really interesting for me to read through. Such a lot of work goes into it.
Sarah
July 26, 2013 #
What an amazing post! It’s fascinating to see how much work goes on behind the scenes of such wonderful products. Absolutely adored reading this!
Cheryl
July 26, 2013 #
Thank you for this! I was curious how you guys manage to create these wonderful patterns. Keep it up!
Paulette
July 26, 2013 #
I love this post, it’s nice to see your product development process. As as a fashion designer, you can say there are some smilarities in the process when developing a collection.
Ingrid Schorr
July 26, 2013 #
This real live squishy woman appreciates the care you put into design and instructions. I’ve learned so much! I am also a very experienced copy editor, if you ever need another freelancer.
Pauline
July 27, 2013 #
What an interesting post! I am working on a first pattern and that’s very valuable information. Thanks for the behind the curtain scene Sarai.
Bye from Spain
cathy
July 27, 2013 #
just curious (if its a secret feel free to ignore me) but why the “10” before all the pattern numbers? i have your patterns in .pdf file and its fun seeing them line up 1002 all the way to 1026 – it made me realize that they went older patterns to newer patterns! Though i did notice the free patterns are “00” instead of “10”
Sarai
July 27, 2013 #
The first two numbers represent the product line. If we came up with a new, different line of products, we’d start numbering it 1101 or 2001 or something along those lines. The free patterns start with 00 to differentiate them.
Penina
July 27, 2013 #
Wowee! This is such a mysterious world to me. I do know, though, how much work goes into communicating all these steps if they have never been put into words before. I’m very grateful you took the time – I’ve learned a ton!
coffeeaddict
July 27, 2013 #
What a wonderful treat to get to take peak into the process of creating a pattern. I really like allo of the sketches with tons of details!
strixxvaria
July 27, 2013 #
Will you ever make patterns for plus sizes?
Hanna
July 27, 2013 #
I really enjoyed the behind the scenes on how your patterns are made. Thank you for sharing with us.
Ledys
July 27, 2013 #
This post was awesome, Sarai! Fascinating! I particularly enjoyed reading about the process with the testers. How exciting it must be to come in to the studio and talk patterns with you!! :-) and that test version is absolutely fabulous!
Ledys
Sherilyn
July 28, 2013 #
This is a wonderful peek into how your lovely patterns come to be. I loved it. Thank you!
Claire (iwanttobeaturtle)
July 28, 2013 #
Ah, I often wondered how it all happened. Thanks for sharing this peak into your processes. It is inspiring!
Laura
July 28, 2013 #
Do you do your pattern own grading in house or do you send it out? Do you fit/test each size?
Sarai
July 29, 2013 #
Pattern grading is in house, though we’ve sent some out in the past. We don’t personally sew each size, but we choose testers in a range of sizes, so we can see how things work on them.
Kat
July 28, 2013 #
I LOVE posts like this that delve into your processes. I’m curious about your background in “User Experience”. Both your website and book are extreemely well done and really user friendly, which is a credit to you and your background!! What is a “User Experience” background? Did you take some courses or have a degree? Where would one begin looking for such an education? Thank you, I really admire you, your work and Colette Patterns!
Sarai
July 29, 2013 #
I have a graduate degree from the UC Berkeley School of Information. But people I’ve worked with have different types of educational backgrounds, from cognitive science to anthropology.
I was a UX reseracher. That means I studied how people used products, what their underlying needs are, and how to design products that fit them better. It’s like market research, but instead of focusing on selling products, it’s focused on making products better.
This sort of work is used on everything from creating better UIs for online banking, to designing mobile apps for tuberculosis patients in Kenya. It’s a very interesting field with a lot of applications!
Kat
August 2, 2013 #
Very interesting, thank you for your reply! I could see how that kind of education would help in a small business situation. I love the idea of “design thinking”, which has a similar focus on the customer as opposed to the product.
Fiona
July 30, 2013 #
Fascinating! Thanks for sharing your process!
Melanie
August 4, 2013 #
Just curious, but what are the two fabrics used for the dress in photo #7, right under the “Step 6: Testing: header? I would KILL for that skirt fabric!! Or, really, any good border print.
Sarai
August 5, 2013 #
That was sewn by a tester, not us, but perhaps if she sees this she will answer!
Amy
August 7, 2013 #
Hi your pattern tester here, so cool to see that people like the materials that I used for the Hawthorn. The skirt fabric is amazing and it really inspired me to go “crazy” with the details – thus the piping which matches some teal highlights in the print. The print is a cotton voile that I picked up at Mill End in Portland, the sales lady mentioned that it was selling fast and when I went back a couple of weeks later I noticed that it was gone. On the remnants that I have left, it says “Star Fabrics Inc Style NO: 2113-59367DB. However, when I looked up Star Fabrics Inc. I didn’t find anything. The top is a Kona cotton, which is far heavier than I would have liked especially considering the weight of the skirt, but it was the only thing I could find that matched the coral of the flowers closely.
Melanie
August 9, 2013 #
thanks for the reply. I will try to locate it, but I guess it doesn’t look good.
Sara Lily
October 1, 2013 #
So interesting! Thanks for posting! Patterns are so important.
Juliana
May 26, 2014 #
very generous of you, sharing all this.
It comes to attention how well organized the whole process is. And how curious about your education and path from there on… Great job!
*