
 Sign In

Process Diary: Visualizing and learning through planning
Here are some questions for you:
- Do you make decisions about exactly how you want a pattern to fit before you make your first muslin?
- Do you analyze how a pattern will fit on you – before you sew it?
- Do you track your own body measurements?
- Do you track changes you make to a pattern?
- Do you feel like you get better at visualizing fit with each project you sew, or do you feel like you’re always starting over with each new garment?
One of the toughest parts of learning to sew and fit garments has to be learning how to visualize a finished garment and most specifically, how it will look on you. Being able to do this means more than just being able to choose the right patterns and fabrics for yourself. It also means being able to better predict what adjustments you might need or want before you sew a stitch.
I’ve heard so many sewists talk about what a challenge this is for them, believing they just don’t have “the knack” for visualization.
But I think there’s just as much science to this as art. What you need more than anything is a simple process that gets you thinking about your project in terms of measurements and fit from the very beginning.
Meet the tech pack
One of the most important tools in apparel manufacturing is a handy document commonly referred to as a tech pack.
So what is a tech pack and why should you care?
A tech pack is a living document: a set of charts, tables, diagrams, and other information that tells you everything you need to know about a pattern as it moves from concept all the way through manufacturing. It’s meant to be updated, to serve as both guideline and history.
A tech pack is meant to be used for pattern development. It helps everyone on the team to communicate about the intended look and fit, to see changes as they happen, and to pass this information along easily to a sample sewer or factory.
It also helps you to become very familiar with measurements and what they mean for fit. You begin to recognize exactly what 4 inches of ease in the bust looks like, and how it looks different from 3.5 inches. You know what a skirt length of 25 inches means on the body, and when you might want to lengthen or shorten to get the look you want.
You learn to do this by working closely with measurements, and doing it over and over. So why not apply the same principles to your own sewing? All it takes is a consistent practice of interpreting, adjusting, and documenting measurements.
You might call your own process something different, like a “project plan” or “project diary” or something else that makes more sense to you. But you can take the parts that are helpful and make your very own version of a tech pack.
Keep it simple
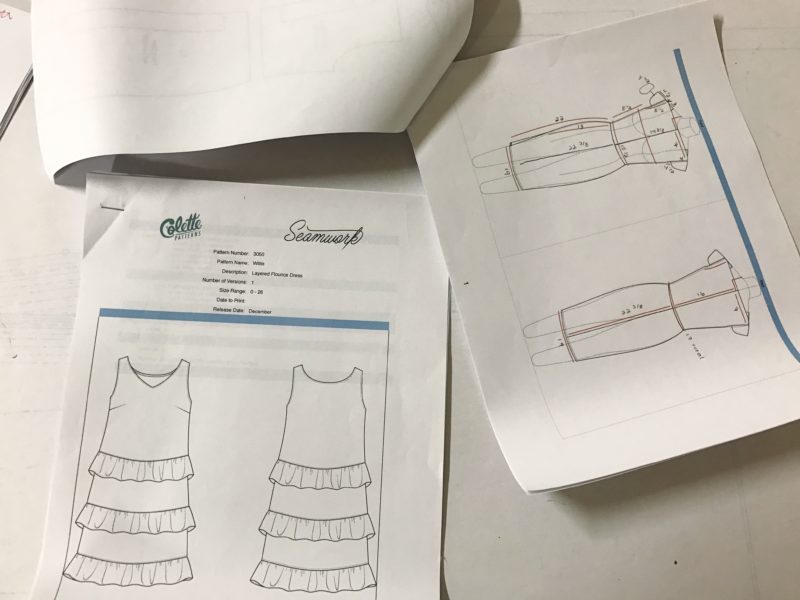
No two companies have tech packs that are the same. Some are very simple, basically just a spec sheet (essentially, a technical drawing and some measurements) and some grading info. While other tech packs go into tremendous detail (particularly if they’re working with overseas factories).
Over the years, ours evolved to be quite comprehensive. We’d added more and more information to our packs, with all sorts of illustrations and measurements and other details we thought would be helpful.
When we decided to rethink them, we started by looking over many many examples, from the very simple to the 20-page mega-corp versions. From each, we took note of things that would be particularly helpful, and crossed out what was irrelevant. Then we got input from others who’d worked with many types of tech packs.
What we’ve discovered is that in some ways, our tech packs were actually way too detailed. In other ways, there wasn’t quite enough information. But it was actually the overabundance of information that was causing problems.
In other words, you only need to include what’s useful and relevant. More information isn’t necessarily better.
Here’s what we found were the most important functions, which we kept and expanded on while eliminating others:
- Documenting the intended overall look and fit.
- Keeping track of fit changes.
- Documenting grading.
- Planning the construction process.
Those are the main areas of focus for our own documentation here at Colette. But what about your sewing projects at home?
What to include in your project plans
First of all, I don’t think you need to make a plan like this for every project you sew. That might be overkill.
But if there are projects that you plan to put a lot of fitting effort into – say, a pair of fitted pants or a tailored blazer or dress – it’s more than worth it to create a bit of documentation to help you get the most learning possible from the process. I also think it’s helpful if you’re making something you plan to make over and over again.
These are the things I find to be most useful to include in project plans for things that I sew at home. I’ve started to use this on my next really tailored project, a pair of wool pants. You could add or subtract from this based on your own needs.
What I’ve decided to include:
- My own body measurements. It’s important to know what your measurements are, including length measurements as well as circumferences. I keep track of these and update them every few months.
- The intended look you want. Write down how you want the garment to fit. It’s really helpful! This can also be a good time to try on and measure similar garments that fit you well.
- Your pattern’s key finished measurements. You can compare these side-by-side to your own measurements and instantly see how much ease you have in various areas. Over time, with each project, you’ll begin to learn what that amount of ease looks like. If your pattern doesn’t include tons of finished measurements, you can measure the pattern itself (be sure to subtract seam allowance). You can also check these measurements against a garment that fits you well, to see how the pattern differs from the look you want.
- Changes you plan to make after your first muslin. When you fit your muslin, take note of the areas of concern and where you plan to make adjustments to the pattern.
- Updated measurements. Update the measurements of the pattern, and you’ll see numerically and then visually how the fit has changed. This will help you get better at visualizing changes over time just by looking at numbers.
- Any construction notes. If there are things you want to change about the construction, you can keep track of these as well.
While traditionally, tech packs are usually large spreadsheets, this type of documentation could work just as well as notes typed on your phone (I like Evernote) or jotted in a notebook like the Colette Sewing Planner or a plain college-ruled notebook.
Here, I noted my own key measurements, then the pattern measurements. From this, I can clearly see that I will need to reduce the ease in the waist and probably narrow the leg to get the fit I want.
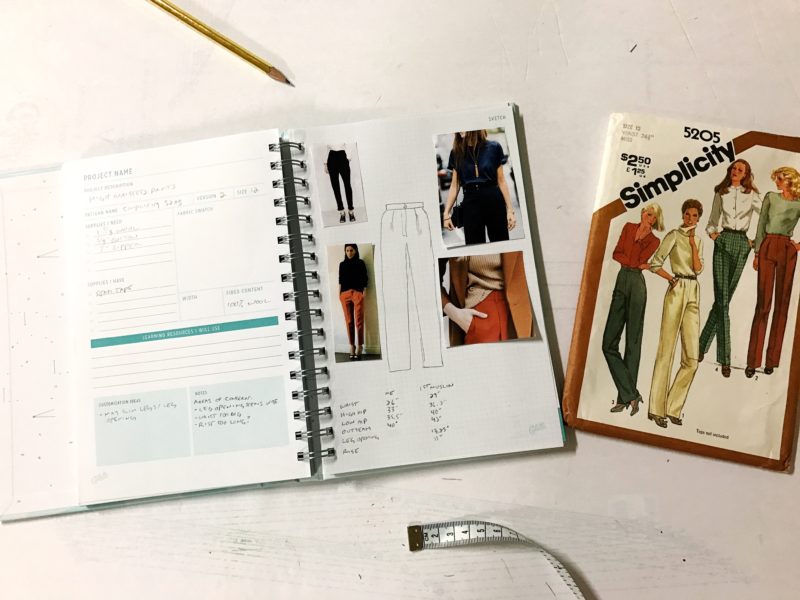
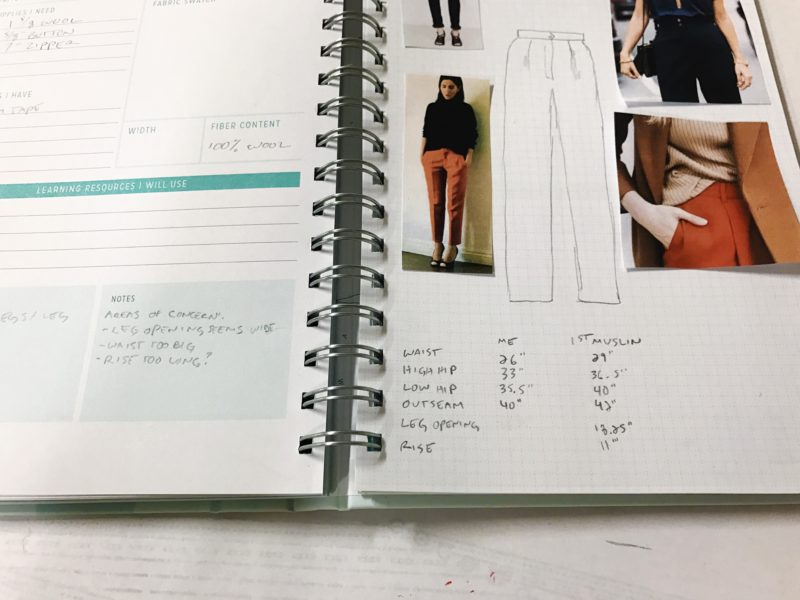
I noted these areas of concern in my notes section.
In many ways, the information you collect will be quite different from what’s needed in an industrial setting, but the spirit and utility is really the same: having a place to think through all the details, creating a consistent process, keeping track of your adjustments, and giving yourself information to learn from in the future.
When you’ve done this once, you will have a wealth of information to refer back to the next time you want to sew a pair of pants. Seeing all those measurements and changes will be worth its weight in gold.
Comments
wendi
December 13, 2016 #
Great suggestions, thank you!
Kristin
December 14, 2016 #
Very thoughtful, helpful and doable!
Claudia Retter
December 14, 2016 #
As a beginning sewer working with my first patterns, I’ve made the mistake of not keeping track of changes, details, etc, and have had to start from scratch every time I want to make a garment again. I know I need some kind of system to keep track… thanks for the suggestions and inspiration! I’d love to see more examples of other sewers’ notebooks…
Nicole
December 14, 2016 #
I’m loving this series Sarai! Especially seeing how you relate what you have learned as a company to how to apply it at home. Though my career is in product development, I rarely carry over all those skills into my home studio. I treasure tech packs, yet don’t usually take the time to create a simplified version for myself, resorting to shortcuts in my haste to see clothing come to life. This is a great learning experience for both the company and home sewists alike.
Jenny Sandoval
December 14, 2016 #
I don’t “tissue fit” (in parentheses because I’ve never used a Big 4) and I don’t muslin fit very well because I suck. If anyone lives in the Seattle area and wants to sew with a no-filter-but-politely-southern gal, help!
I flat pattern fit, mark on the pattern each adjustment and once I’m happy, I interface or glue to card stock the final edition for permanency. I only fluctuate in size during my *ahem* monthly. So, my size stays the same.
What I do is keep some lower quality knits and wovens to make wearable muslins. I do everything on the muslin: hem, put in welt pockets, install zippers, you name it. I then take my wares and donate them to the local battered women’s shelter.
I also make a bunch of muslins in different sizes for friends and family, and even sometimes sew up the pattern as-is to get an idea. This way, when I make my donation, there’s not a bunch of size 0-2 curvy garments that will fit like 1 other person ?
Bunny
December 15, 2016 #
I worked in a garment factory where this was really kept quite simple. FWIW, it was/is the largest manufacturer of men’s clothing in the country but now off shored. We put out 150,000 garments a week before off shoring. The designer developed a technical drawing that got executive approval. It was as simple as the drawing you show on the right in the first picture, one page. After approval, it was shown to the fabric buyer and he would start purchasing goods. It was passed to the head pattern maker who already had a graded out system and note was made of any difference from the basic sloper, ie, enlarge the lapel 1/4 inch. He would make new templates and they went to the master cutter who oversaw the cutting which was really a magnificent thing to see. Imagine 12 foot wide fabric stacked a foot deep and then cut! Then all was sent to the stitching floors of three factories. But it really was a simple process with minimal paperwork and tried and true slopers.
I follow similar to this day in my own work. I keep a notebook, but by using the same patterns consistently I know what to change every time without too much thinking. Everything gets flat pattern measured and I adjust accordingly. I don’t measure and mark everything in my notebook. Instead I will keep track of changes from the pattern that I make, like they did in the factory. For example, I will write “*Added two inches to waistline measurement.” I can refer back to my notebook, look up the pattern number inside and know that next time I have to add that amount. I think having TNT slopers that fit well is the key and it is well worth the time to develop them. This info prevents making muslins, which I do believe in, but not every time a pattern is used.
The process described here has a few similarities but personally I think it is over thought and a bit heavy on the documentation but whatever works for people is good. My notebook has been very valuable to me. I do like to keep notes regarding fabrics and how they relate to the specific pattern. I guess the biggest difference is I use my notebook as a documentation of what I have done to make a garment, not as a way to visualize what a garment will become. I think the best way to do that is to try on lots of retail and make note of what works. Visualizing is definitely hard for some people but turning numbers into visualization is even harder, IMO.
SJ Kurtz
December 15, 2016 #
I’m a notebook person (years of studio art and sketchbooks) and I sew for other people, so I do record what I’m doing with a project, the order/reorder/rereorder of construction, and dates for everything. I trace a pattern before I alter it and mark where/why I’ve altered (mostly because of vintage pattern use). I also make notes to go in the pattern envelopes.
I learned all this the hard way; I’d make adjustments to a pattern and not indicate when or why. I’d go back to the pattern, which should be an easy move, and either have to start from scratch or have an utter fail on my hands. If I don’t write it down, I will not remember it in a year or two, and all the previous work will be lost.
My weight/health have fluctuated, and I’ve been sewing for over 40 years with many of the same patterns. I work with a block I revise annually, and I still screw up ONLY when I don’t keep notes. If anything, it’s like a sewing diary, with more pictures and scribbling. It’s also a good reminder that there are styles I just look AWFUL in, no matter what.
Diana
December 16, 2016 #
What a fantastic read!! Thank you for helping outline a process for the home sewist. I feel like a little direction can make all the difference and I can’t wait to tackle my next project!
Lynda
December 18, 2016 #
Every time I read a Colette blog post and the great comments made, I wish there were love, agree, educational and interesting buttons to click (as on Ravelry) such a simple way to acknowledge the writer. I appreciate the creative, interesting, talented and generous online sewing community :)
Carol
December 20, 2016 #
I love this series you have been writing. Could you at some point talk about proportions on different bodies? I’m really having a hard time figuring out what silhouette is best for my body type. Either that, or if you could recommend some books. The few times I go to the mall I’ll see something on the hanger, or on a mannequin, then try it on and of course to my eye it just looks wrong. Part of my problem may be that I’m comparing what I’m trying on this body to the one I used to have, but it could also be that the proportion or shape isn’t quite right. I end up leaving the store without buying anything. I do the same thing when looking at patterns. I’ll love the way the model looks or the line drawing looks, but I don’t know how to translate that to my body. I’ve ended up stuck in a jeans and sweater cycle because I’m afraid to put in the time and expense of making something and then being disappointed by how I look in it.
PsychicKathleen
December 20, 2016 #
When I started sewing I just made quick notes on the pattern instructions and sometimes on the pattern pieces but as I’ve moved along I’ve found that having a book (like your wardrobe planner) extremely helpful. I agree that having a few patterns that fit you really well and look great on you is the goal but you seem to have to try a lot of patterns to get there. I’m still learning that different fabrics will produce such different results – it seems so obvious but it’s actually a really challenging task! One of my first garments was the Laurel dress in a woven and it was too snug so then I made it in a knit and it was huge :) I still love the Laurel and I will do it again as I get better at pattern fitting. That’s another challenge that seems to be ongoing. I also have to train myself to stop messing with my patterns and copy them first and make the changes to my copies – I’ve had to order at least 4 patterns again having messed up my original so badly I couldn’t find my way back to the original :)
Avalon
December 31, 2016 #
This links with my first ever serious ‘sewing resolution’. I have taken on board the planner idea and have started keeping a specific sewing notebook and put in some of the suggestions made on this site. I have never completed an item of clothing for myself as I always have to make adjustments and can’t seem to get it right. I have found many pieces of paper over the years with what seemed to be sewing adjustments written on them but they were useless as I didn’t record what they referred to. I even made a muslin for a dress which seemed roughly ok and then when I made the dress it swung out at the front and looked stupid. That was on a sewing course and the tutors comment was ‘Just pull it down at the front, it will be fine’. It wasn’t fine and its still in the draw! I’ve put on weight since, lol, so it will probably stay there. Anyway, in 2017 I want to complete 3 garments that I can wear all semi-fitted (otherwise I look bigger than I am) and with proper adjustments. I have everything I need to make them. Now I just need to concentrate on the process and not on making a first time perfect garment. Yes, I can do this! Thanks for the inspiration everyone. Happy New Year.