
 Sign In

Setting up (or upgrading) a sewing space
After being spoiled by working in a fully equipped sewing studio for many years, I finally decided to set up a small sewing nook at home.
Although I don’t have much space, and the sewing area is going to be relegated to a small corner of a dark and cold basement, it’ll be nice to have a bare bones sewing area for those times I don’t feel like commuting to sew on the weekends.
For this space, I needed all new tools and equipment, but I wanted to keep the budget low. With that in mind, I thought I’d share a few different options for setting up a new sewing space, or upgrading the one you have.
Option 1: The minimalist space
If you don’t have much room or don’t want to spend too much money, this is a good place to start. You can really build onto this foundation, but this is enough for you to get going on your first project, adding tools as you find a need for them. That’s my approach.
Links to the tools are below. Some are in our shop right now, others are amazon affiliate links, but you can also find many of these tools in your local sewing store.
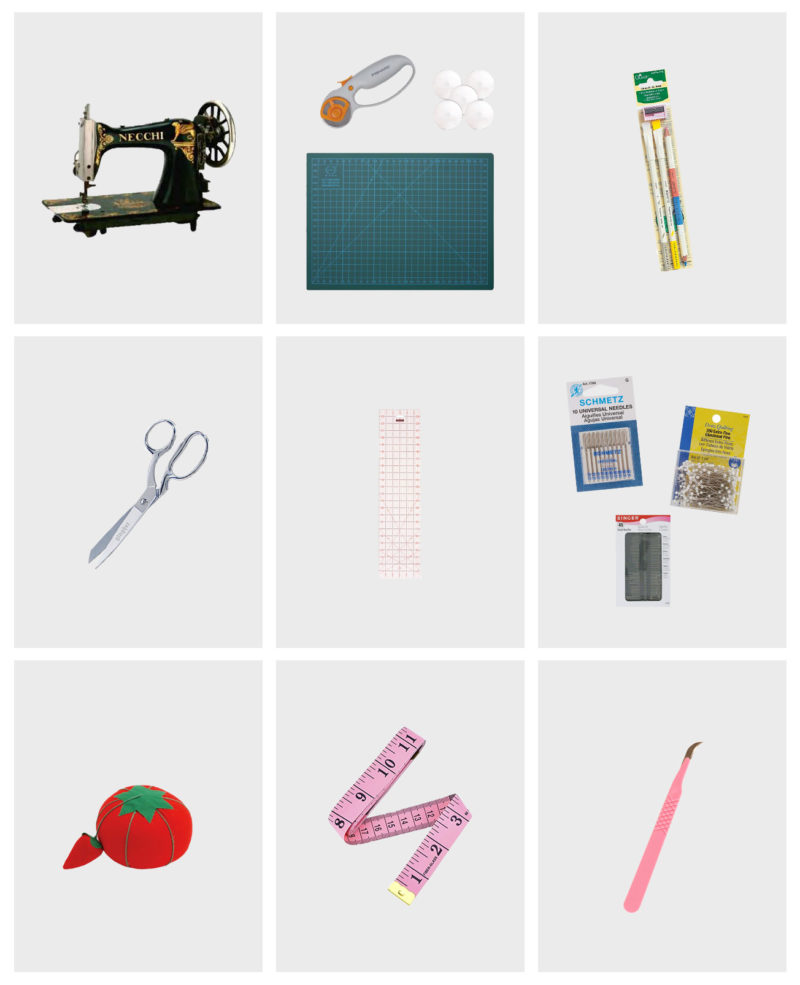
- An inexpensive sewing machine. For this, I went with a vintage workhorse, a classic Necchi I bought on eBay. The image is a different model, but you get the point. A good vintage machine can be quite inexpensive if you hunt! [Cost: $100 plus maintenance to get it spruced up.]
- Rotary cutter and mat. This isn’t strictly necessary, depending on your preference, but I always use a rotary to cut. I have an A1 size (36×24) and fiskars 45mm rotary cutter. I also bought extra blades. [Cost: for mat $38.99, cutter $11.18, extra blades $14.38]
- Marking pencils. My favorite are the Clover Chacopel pencils [Cost: $4.74 for 3]
- Dressmaking shears. I always go with gingher! Mine are 8 inch knife-edge dressmaking shears. [Cost: $23.91]
- Ruler. Clear rulers are a valuable tool! This is a big 6×24 inch ruler, great for quilting! You could also go with a smaller 18″ ruler for everyday sewing. [Cost: $10.19]
- Pins and needles. I always prefer glasshead pins, because they won’t melt. Also, a variety pack of machine needles and hand sewing needles will serve you for a long time. [Cost: About $12]
-
Pin cushion. The classic tomato, you can’t beat it! [Cost: $3.51]
8. Tape measure. I actually already had this at home, but didn’t want to leave it out! A tape measure is a must-have. [Cost: $4.99] - Seam ripper. You will inevitably need this tool. I like the scalpel seam rippers best of all. [Cost: $5]
Total cost: About $229, including the $100 I paid for my machine (excluding maintenance).
This doesn’t include supplies for individual projects (like thread), and it does assume you have a few basics at home, like a functioning iron and and ironing board and a table.
This is a very, very basic set up that can get you through at least a few projects before you start itching for more.
Option 2: The upgraded space
These are some common tools and equipment you might add over time, as you uncover new needs or interests. These are the ones I plan to add as space and needs arise.
-
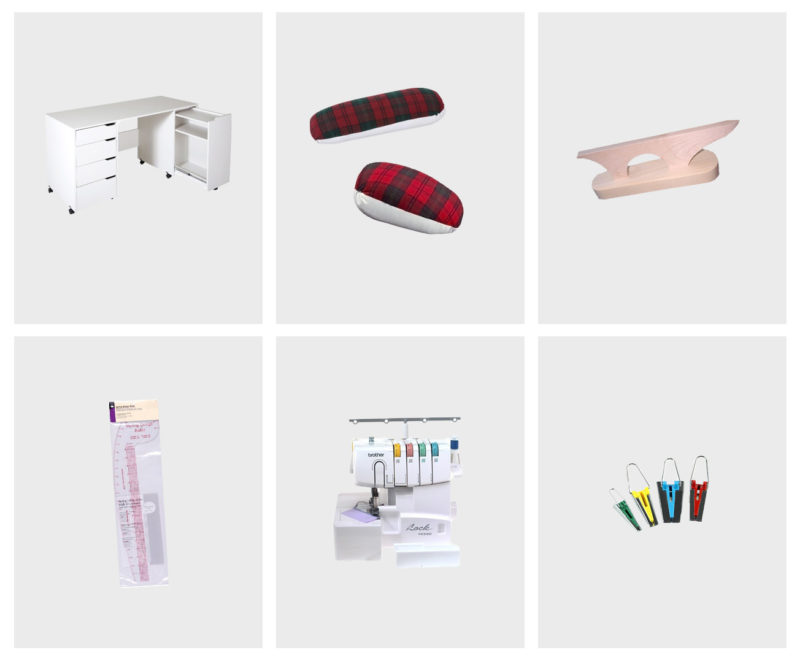
A sewing cart. For stashing all that stuff away when I’m done. This one looks small and functional, but I feel like I could rig up something cheaper and better looking via Ikea. [Cost: $255.98]
2. [Tailor’s ham](http://amzn.to/2gcqwHt) and seam roll. Two of my favorite pressing tools, these are at the top of my list. [Cost: $20.44] - Clapper and point presser. I consider the clapper/point presser a necessity for any sort of tailoring, so when I get around to making a coat or jacket at home, I’ll snag one of these. [Cost: $38.99]
- Curved rulers (French curves, hip curves, etc). I use my curves frequently for modifying patterns and making adjustments. [Cost: $18.79]
- Serger. A little more of an investment, but invaluable for sewing knits or creating quick finishes. The Brother 1034D is an inexpensive, easy to use, tough little machine. [Cost: $207.66]
6. Bias tape makers. I love these little guys! [Cost: $4.73]
Total cost: $546.59
Of course, you wouldn’t need all of this at once, and some things you could find cheaper solutions for, or ignore all together (like a sewing cart).
Option 3: The fully equipped space
Over time, you find more and more handy tools. The options here are endless, but here are some of the ones we get the most use out of in the ColetteHQ sewing room that you might not have yet. Some require a fair bit of space, others are more specialty tools that still come in handy.
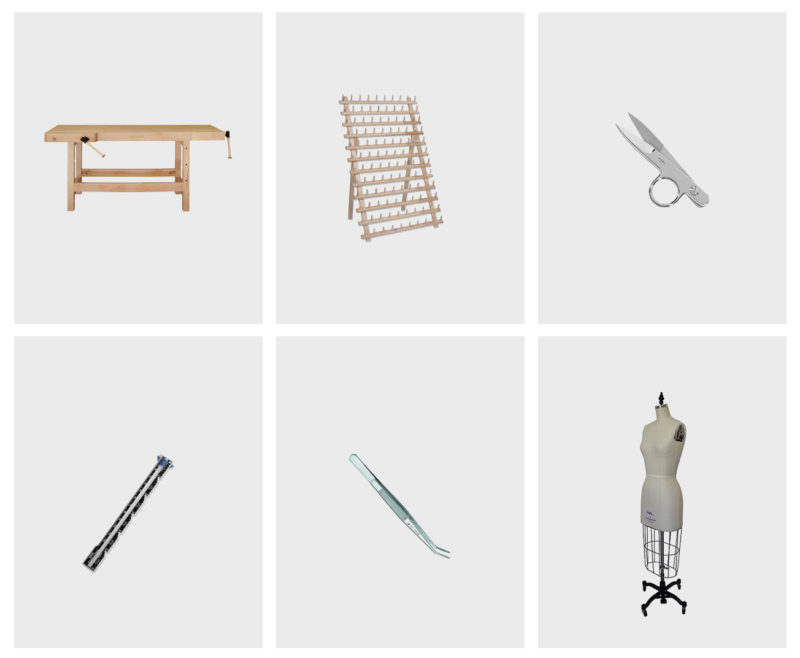
- Custom cutting table. We just had one of these guys made for our studio by a man who makes workbenches. [Cost: $300 and a lot of space]
- Thread holders. You can mount these on the wall or stand them up on a table or shelf. Alternately, I also like thread caddies. [Cost: holder $26.85, caddy $15.31]
- Thread nippers. Snips for those little tails that you can keep close by as you sew and cut. [Cost: $15]
- Seam gauge. Not an absolute necessity when you’re starting, but the seam gauge is a tool you will definitely appreciate the more you measure small areas like seam allowances. [Cost: $5.49]
- Tweezers. Sewing machine tweezers are very helpful for threading, especially when it comes to the serger. [Cost: $5.79]
- Dress form. This is an important piece of equipment, but one that takes up quite a bit of space. I do like the PGM forms, but there are many options. [Cost: About $499]
Total cost: $852.13, including $499 for a dress form.
Again, cheaper options are available!
Of course, there are many, many, many other tools you can add to your sewing kit as you need them, but these are the ones I’d say I use most frequently. The three options build on one another, so you can upgrade slowly over time.
What would you add to the list?
Comments
Linda
December 15, 2016 #
Great post. I would love to learn more about the ham and clapper’s uses. ,
Katie
December 15, 2016 #
Hey Linda! Check out David Page Coffin’s article, A Pressing Matter, for Seamwork Magazine. You’ll learn everything you’ve ever wanted to know about pressing!
Jessica
December 15, 2016 #
Fascinating! I’ve never had much more than the minimalist space setup, although I did finally get a serger (at Wallace’s urging!) and wow, do I love it. Right now I have a sewing machine, serger, and two desktops crammed onto 2 tables along 1 wall in my home office (which is itself tiny — I call this setup my Machine Death Row). There’s actually so little space that the sewing machine and serger sit behind one another, and I have to move one keyboard if I want to pull out my serger, haha. Pressing happens on the kitchen table, which is good for forcing me to get up and move. I usually group my sewing so that I get as far as I can in multiple parts of a garment and then go press everything simultaneously. As to tools I’d add, I love the pen style chaco liner. So easy to use! I like to store all my tools in an utensil basket I thrifted, the little compartments are perfect for holding scissors, rotary cutters, marking implements, etc., it’s compact, and the handle is great for moving it around.
Yazmin
December 15, 2016 #
Thank you for this post! I”m just getting started in the world of sewing, so this is great info on what I need to get started! Do you have a post about the best places to buy fabrics (best quality, good prices) besides Joann’s and other commercial stores? (I live in San Diego, CA in case you have any suggestions specific to Southern California)
Thanks!
Heather Oliver
December 15, 2016 #
If your ever in Orange County, I’d recommend M&L Fabrics in Anaheim. They have a lot of fabric in the $2.99/yard range and quite a variety.
Sarai
December 16, 2016 #
I’m from Westminster and used to shop at M&L in high school all the time! It’s massive, and great for discount fabrics. Very cheap.
If you can get up to Los Angeles there are tons of options… the fabric district plus wonderful stores like Mood and The Fabric Store. I’m not as personally familiar with San Diego.
Coby
December 16, 2016 #
Try Dharma Trading! I think they’re in SoCal as well. Great prices on silks!
colleen
December 16, 2016 #
Dharma Trading is in Berkeley but you can shop online.
Tina
December 17, 2016 #
Actually, Dharma Trading is in Healdsburg/Petaluma, unless they now have a retail store in Berkeley. I order from them all the time. Their prices on fabric undercut most outlets, but mostly they deal with white for dyeing. they do have silk in colors though.
Very fun catalog to browse.
Colleen
December 17, 2016 #
You are so right and I am so OLD. They closed their Berkeley store in the late 70s, and that’s the one I’m thinking of — you can find a photo of it on the web. I started knitting in the 70s and I went in their to get wool and they were so incredibly nice. After a long creative hiatus I started ordering from them when I began to sew and knit again, without even thinking they were no longer in Berkeley!
Thanks for letting me know!
Kate Nakano
December 16, 2016 #
I live in San Diego and the best place I’ve found fabrics here is at Yardage Town, but the one in National City. There is another place in the Clairemont Mesa area called Beverly’s fabrics and crafts that stocks Cotton and Steel and Robert Kauffman chambray…etc, however, Beverly’s fabric stock is a majority of quilting cotton. There aren’t many other options besides these I have mentioned oh and Joann’s, I rarely go there for fabric though. I mostly resort to online resources or make trips to LA for Mood and San Francisco for Britax
Kate Nakano
December 16, 2016 #
**Britex
Shannon Applegate
December 17, 2016 #
I agree that fabric shopping in San Diego is hard! I am about 45 minutes away from the National City Yardage Town so have to make do with the Yardage Towns further north. I wish there were more stores for clothing sewing!
Kate Nakano
December 17, 2016 #
Me too Sharon. I’m in central San Diego (I live near Balboa Park) in Goldenhill/South Park. I find some gems in Yardage Town, but it requires combing over each stand of Bolts touching everything and looking at fiber content. The National City one is huge which is why I deem it the best. I am sorely disappointed and I have lived here for 37 years. There isn’t a huge sewing “community” at least that I am aware of and the small business/artisans are slowly on the rise as it seems we are late to the party.
Kate Nakano
December 17, 2016 #
**Shannon, sorry, I dunno why I read Sharon.
Andrea B
December 15, 2016 #
Pattern weights! It’s easier to buy a bunch of cheap flat washers than rely on soup cans or other heavy knick knacks. Also, tracing paper!
Pelly
December 15, 2016 #
I recommend a large, flat basket to store the current work in progress.
I don’t have a dedicated sewing space. Instead, I use my kitchen table during the day when my children are at school, or in the evenings. This means I need to keep my set-up very streamlined and make sure that I can pack up very quickly.
My kitchen table is extendable and makes a good cutting table. My sewing machine is stored in an accessible place, my ironing board and iron likewise. My basket, as described at the beginning of this comment, holds all the requirements for the current project – pattern, fabric, notions and a tray with scissors, pins, tape measure, seam ripper, the appropriate presser feet etc. Cut-out garment pieces are loosely rolled and laid on top of the basket. Once a garment gets to the point where it can be put on a hanger, I keep it on the back of a door. The basket itself can be stored on top of my wardrobe. I can set up and pack up in five minutes or less.
Amy
December 16, 2016 #
Awesome idea! Love the flat basket idea, I have two cats so I always have to put everything away.
Jess
December 16, 2016 #
Great post! I so need to add a clapper to my supplies in 2017.
I might suggest for vintage machine buyers to consider a vintage cabinet to go with it over a particleboard one. There are plenty of cute and inexpensive solid wood cabinets in thrift shops or on Craigslist that only need a clean and/or treatment with Howard’s Restore-a-finish to make them perfect for a MCM home. I feel like cabinets are completely overlooked with Ikea, Amazon, etc. dominating modern craft room looks but they can be fantastic for smaller spaces and are real furniture pieces.
becky shook
December 16, 2016 #
i just finished redoing my sewing room. you can see what inspired me…the first pic is the before and then lots of finished pics
Mickey
December 16, 2016 #
I have a cute small metal rolling cart from Ikea. I like to keep my current project in it along with sewing tools. They are only $30 .
Lisa W
December 16, 2016 #
I took over our living room/dining room space years ago. It’s large and not well lit. I used solid core doors and kitchen cabinets to make work spaces but this article has sparked me to really plan and make a more useful space. Just planning now but I currently keep out and ready to use my sewing machine, serger (new), dress form and ironing board. I have bookcases of fabric (I quilt as well as sew clothing). Love the thread holder and custom cutting table you highlight. My lifetime of sewing is worth this effort. Thanks!
PsychicSewerKathleen
December 16, 2016 #
I would say an ironing board (or ironing surface is critical) and a set of drawers for all your notions (and you will need notions like elastics, hand sewing needles, odds and ends for your sewing machines) and a place to do your cutting. I have a minimal space in the front corner of my living room so I want to keep it as neat looking at possible :) and it can’t take up much space at all however it has spread out I must say – my husband remarked lately that he’s noticed how we seem to be watching TV in my sewing room as opposed to having my sewing where we watch TV :))
SJ Kurtz
December 16, 2016 #
I am curious how you are going to use/install lighting in your downstairs sewing place. I’m crammed into a low-ceiling’ed room and rely on reflected lighting for general purposes, and two luxo drafting table lights for task lighting. It’s not an ideal situation (resulting in installing a piece of moleskin wrong face out) for work, but with a 77″ ceiling, not many choices. ‘Can’ down lights were a mistake (too many shadows).
Sewists? Any suggestions?
Sarai
December 16, 2016 #
I have the same problem. We have recessed lighting in the basement with low ceilings, so there are a lot of shadows. There are two small windows, so I’ve positioned things as close to those as possible. Next, I’m going to add some task lighting. I’m also hoping to find some floor lamps that can be reflected off the low ceiling to create more even light throughout.
Claudia
December 16, 2016 #
I have the same isses and wanted to ask the same question. It is about lighting in low ceiling spaces without daylight or only a little. It is for that reason that i do not want to move my sewing space down to the basement where i would have plenty of room!
gabriel ratchet
December 16, 2016 #
start with assessing the bulbs you’re using…. you can get a lot more clear lumens for the same base and voltage if you switch to LED floods in the cans…. you might also find it worthwhile to replace one of the cans with a base for a track set up that could give you flexibility about type and location of fixtures…. there are also relatively inexpensive and long lasting individual battery operated LED spot lights that can be affixed easily where needed…
Sandy
December 17, 2016 #
My last sewing corner had no light, so my husband put up closet-shelf-brackets and hung THREE workshop-style hanging 48″ fluorescent light fixtures, plugged into a power-strip. Not real pretty but very, very functional. Fluorescent shoplights don’t draw a lot of power . . . sewing machine and iron also plugged into power strip; tape deck got its own plug in the wall socket. Bigger problem was layout – I had a 2×4′ table for the sewing machine, a 2×4′ by 6′ tall set of workshop shelves, and the ironing board. Did most cutting on the floor, unless it was small things. Like I said, a corner, but the lights made it work.
Liz
December 16, 2016 #
I’m really lucky to have a whole room dedicated to crafting and it’s mostly filled with ikea furniture. And a lot of my smaller storage units were found in thrift stores and spray painted to match the decor. Don’t forget to check there!
Although my wish list for next year is getting a serger and a dressform. Two things I haven’t had luck in finding secondhand at all. :(
Catherine Siemann
December 17, 2016 #
What a great post for a beginner like me! As someone who lives in an NYC one bedroom with my partner, I can never really have a dedicated sewing space, but this is a good arc for my minimalst aspirations to follow. And I guess I’m ahead of the curve on vintage machines, because I sew on my mom’s 1960s Singer Featherweight, which I adore both for its simplicity and because I remember the lovely things she used to make on it. The only downside is that I have no zigzag or etc, so knits are out of the question for now. I’m toying with the idea of a basic serger to supplement my beloved vintage machine, rather than getting a newer and less charming sewing machine, and that seems to be in line with your post.
Denise
January 5, 2017 #
Catherine, I would highly recommend that you keep your vintage straight stitch machine and add a modern serger to sew knits and seam finishes. Vintage machines like the one you have were made with metal parts prior to the 1970’s and they are real workhorses. As long as you take care of it, that machine will last for many years. Just add a serger as suggested in the article. Sergers are fun and quick. You can finish all the inside seams on your garments with one. You can sew any kind of garment with those two machines.
Endurance ovbigan
December 17, 2016 #
I love sewing and I want to go to a sewing school which I don’t have in my area, I will like to sew my own dress my self or cut my own pattern and my house is a small apartments which there is no space,I have two sewing machines overlock and another singer sewing machine which I use to practice at home I need more help for perfection
Jaclyn
December 17, 2016 #
Great list! The only change I would make is really to put the seam gauge way higher on the list. That seems like a fairly essential notion to me, and it’s one I use on nearly every project. How else do you make sure you’re pressing up the right amount on the bottom of a hem or things like that? Definitely one of the basics.
Caitlin
December 19, 2016 #
Heather Ross’s book Weekend Sewing has another great idea instead of a sewing cart for small spaces–take an old armoire or office computer cabinet and store all of your sewing supplies and machine inside. Then you can tuck it away and close the doors to hide your stuff. Or some great vintage machines come with tables that you flip up to reveal the machine, then flip down again to store it after you’ve finished sewing. Great ideas in this post!
Kelsey
December 19, 2016 #
This list is super helpful, since I’m trying to upgrade my small sewing space. It’s in my already-tiny bedroom! :)
Jayne
December 19, 2016 #
I am a seasoned sewist & have had a dedicated sewing room
In the last 4 places I’ve lived, to the point of forgoing a having my own bedroom in three of them. Siince I got married, I have had the TV room as my studio & in our new house I will have a purpose built space, for my how. Sewing business.
Things that I have invested in over the years as my finances & space allowed, was some shelving to store pattern & fabric containers, a cutting bench & a wheeled trolley. I’m in Australia & our choices are more limited, so I go to Ikea & Aldi. I have a Raskog utility trolley with all my tools, overlocking thread etc,
.My cutting table is one of those hacks of two multi cube shelving units with a melamine desk top & full size cutting mat. you can find tutorials everywhere on Pinterest.
My shelving consists of Mulig for my book & pattern library & shipping ‘centre’, it also has handy hooks on the ends to hang current projects. And a wall of Gorm basic wooden shelving for containers of fabric, yarn, scraps, buttons, trims etc.
Gwen
December 20, 2016 #
A pegboard mounted on the wall is useful for your tools ,ie. rulers, scissors, packaged elastic, ribbon, etc. You can see at a glance opposed to being in a drawer or box.
Prior to moving into a condo (with limited space) I had a cutting table that we made out of a door mounted on a dresser. The drawers were handy for material and whatever you want to store.
Lynda
December 26, 2016 #
I made one of these tool caddies, handy for keeping my table clear of notions and easy to move one thing when I want to cut fabric. Having one has encouraged me to be more tidy. They fold up and would be great for those that have to pack up after sewing – https://www.craftsy.com/sewing/patterns/tooly-tool-holder-easel-pattern-download/219430
Malorie
December 30, 2016 #
Have you ever used a rotary blade sharpener? I got one from modern domestic and it really saves from buying those expensive replacements. Also Swedish tracing paper has become invaluable. Also one of those round rubber bobbin organizers! I have to put all my things away and only have a dedicated spot for my machine but I keep all my tools in a labeled clear plastic shoebox from the container store. Have others for patterns, knitting stuff, etc and they stack in the upper shelves of a cabinet.
Denise
January 5, 2017 #
For a dress form, check out ‘the shop company’ on-line. They sell professional dress forms that look like the Wolf forms for excellent prices.