Tips for using beautiful eyelet borders
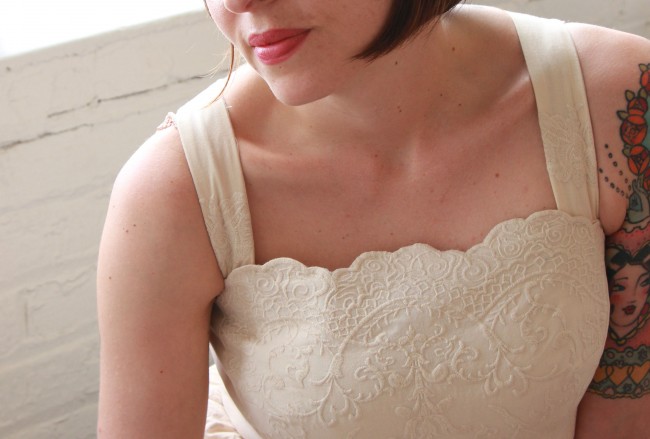
I learned a few things while making my embroidered Hazel dress last week, mostly through experimentation.
I like problem-solving projects like this one. There was a fair bit of head scratching and chin stroking involved in the dress’s construction, so I’ll pass on the results of my little experiments to you.
My main questions going in were:
- Where should I place the borders?
- How do I match up the design at the seams properly?
- How do I stiffen and stabilize the border at the top so that it’s not floppy?
- How do I approach the sheerness of the fabric? Should I line it? And how do I attach the lining?
Placing borders
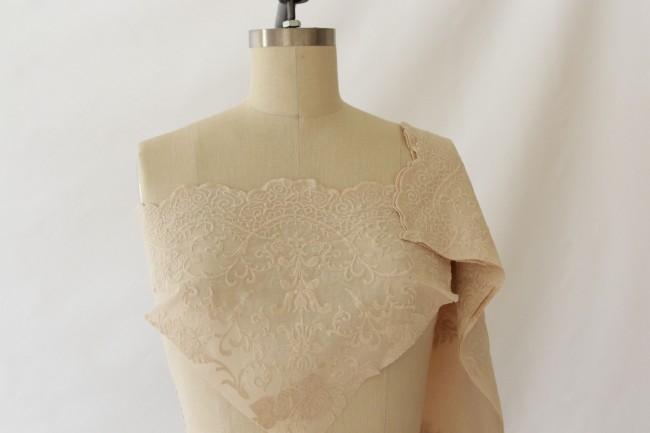
First, I needed to decide where I was going to use the borders. I knew I wanted to use the scalloped border both along the hem and the top of the bodice. But should it be used on the top of the back bodice too? What about the straps? I draped fabric on my dressform to help me visualize all of this. Above, you can see that I considered bordered dress straps, though I ultimately decided not to do that.
Matching the design
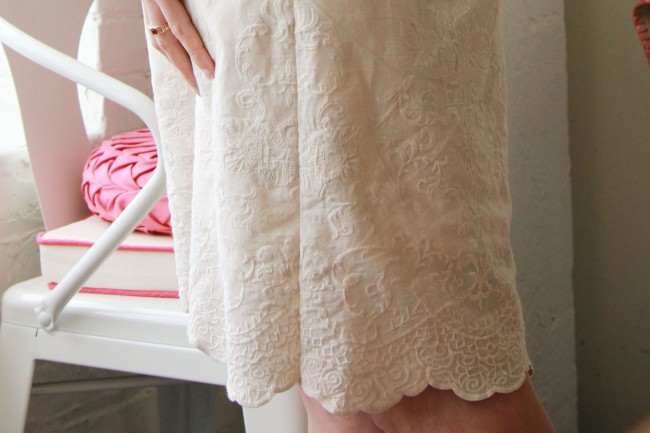
Second, there is the issue of matching up the embroidered design at the seams. This is actually pretty important when using a scalloped border fabric, because if it doesn’t match up you’ll have uneven scallops meeting at the seamlines, which would look pretty wonky.
So you need to place your pieces carefully on the fabric, folding back the seam allowances so that the designs match up at the seamlines (not the raw edges). Cut one piece, then move the adjoining piece around on your fabric so the designs match. This is actually pretty easy for the Hazel, because the front and side bodice pieces don’t have to match (since the sides are cut on the bias). Here is the order I cut mine in:
- Cut the front bodice first. I made sure the scallops were centered here.
- Cut the side front bodice pieces on the bias. There won’t be scallops at the top of these two. I cut an extra wide seam allowance at the top so I could fold over this edge (which I’ll show below).
- Cut the side back bodice.
- Cut the center back bodice to match the side back bodice at the seamline.
- Cut the front skirt.
- Cut the back skirt to match the front skirt at the side seamline.
See? In the end, you’re only matching at two seamlines for this pattern, which is not so bad.
Stabilize the border
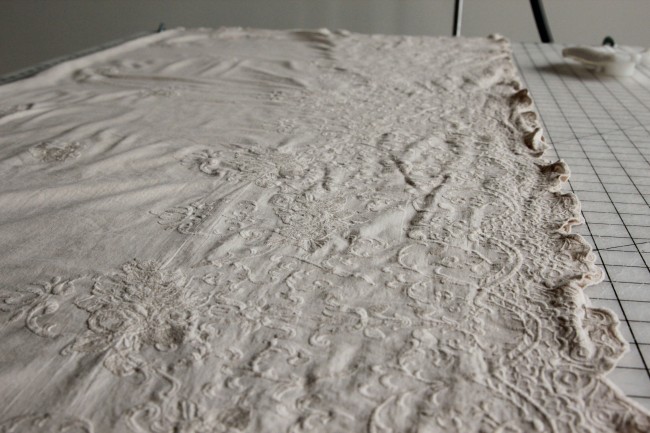
Do you notice how floppy and wavy the border looks on this fabric as is? It works fine when the border is hanging (like on a hem), but at the neckline it would just look messy.
You can solve this in a few ways, but I decided to interface the whole bodice with a woven fusible interfacing. This serves a few purposes. First, it gives more body to an otherwise pretty flimsy fabric. Second, it helps stiffen the border at the top. Third, it gives the fabric more opacity, so that the seam allowances won’t show through as much.
If you do this, be sure to use a woven interfacing, and follow the same grainlines you use on your main fabric. Woven interfacing will stretch on the bias along with your fashion fabric. You could also use silk organza.
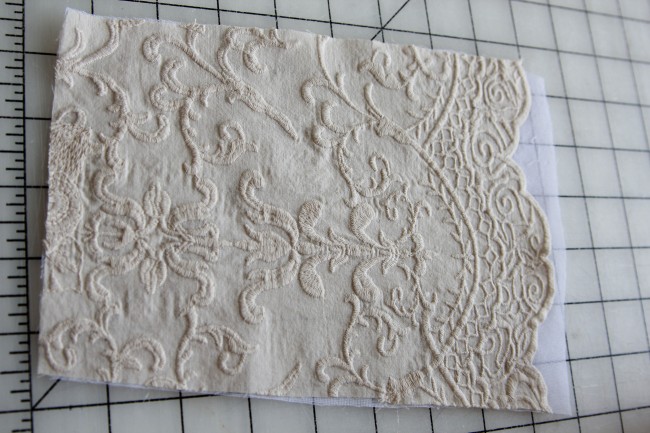
I cut the interfacing a little taller than the scallops at the top.
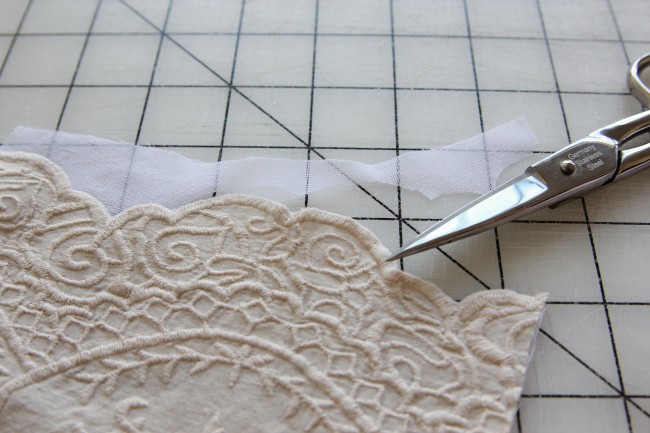
Then, I trimmed the interfacing right down to the edge using small, sharp shears.
If you were using a different color fabric and the interfacing color was really different, I’d probably suggest trimming the interfacing below the edge a bit before fusing, just so you know it won’t show. But if they match pretty well, my method worked fine.
Now. You’re likely going to have to line your dress because most fabrics like this are rather sheer. But how do you line that border at the top? It’s interfaced, so you can’t just leave it as is unless you like the look and feel of scratchy interfacing against your skin.
I did consult Susan Khalje’s Bridal Couture book (which is excellent) for some ideas here. I thought about zigzagging the lining along the scallop border, similar to something she suggests for lace, but realized it wouldn’t work very well here.
My solution was simple. I took my cut pattern pieces and laid them along the edge of the fabric I had leftover, matching up the scalloped edges. I then cut facings from the border.
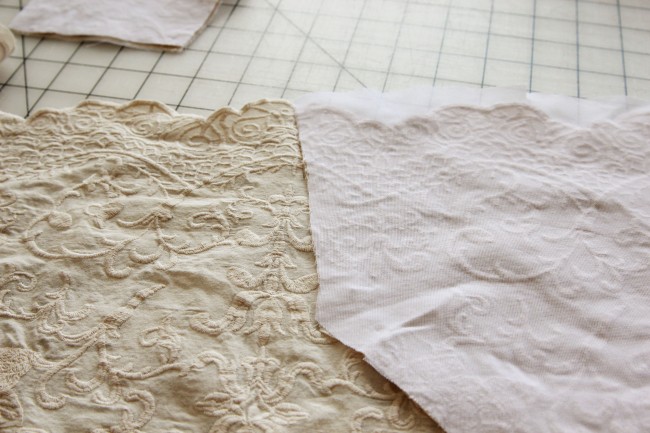
I pinned the facing to the neckline of each pattern piece and carefully fellstitched them together by hand along the scalloped edge. It sounds painstaking, but it really doesn’t take very long. And having this extra layer means the border is now quite stiff.
There’s one final challenge with the neckline we should deal with. The side bodice pieces are cut on the bias, so they won’t have the scallop at the top. So how do you finish the neckline on these pieces and match them up with the scallop?
I simply cut the side bodice pieces with a nice wide seam allowance at the neckline. When I assembled the bodice, I pressed the seams toward the side bodice, then folded the seam allowance over at the neckline. Like so:
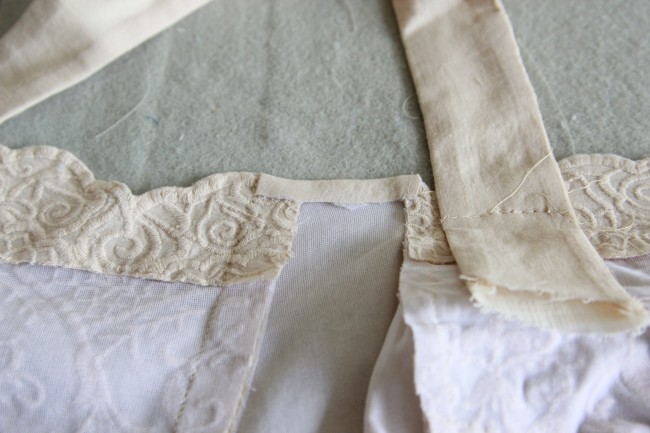
If I were doing it again, I’d cut the seam allowance much wider, so it would actually extend to the same width as the rest of the neckline facing.
Lining
Lining is pretty straightforward, actually.
I cut and sewed the lining just like lining any other dress. When it came time to attach it to the shell of the dress, the neckline was already taken care of with the border facing I’d made and fellstitched. So all I needed to do was attach the lining to the facing.
I think you could do this a couple ways. You could trim the lining at the neckline and machine stitch it to the facing. But I chose to simply pin the lining into the dress, matching the waistline and seams. Then I folded the lining under at the top and fellstitched it by hand to the facing. I chose to hand stitch it because it gave me more control.
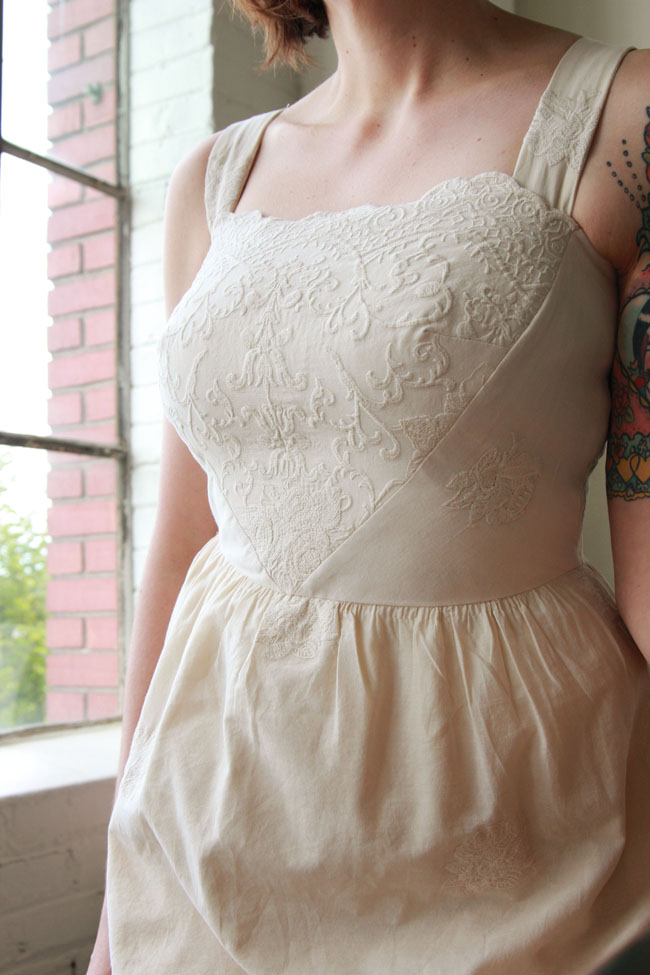
And that’s it, a beautifully lined and finished dress, with no floppy scallops in sight!
I hope I haven’t made this seem too daunting, because it’s really not! After cutting it out, I sewed the whole dress in a day, so it’s not that time consuming, even with all the hand stitching I did.
Even if you don’t use these exact methods, I think just asking yourself the same questions I listed at the top is a good place to start. I’m sure there are many other methods you could use, but it’s helpful to keep these challenges in mind.

 Sign In

Comments
Kat
June 12, 2012 #
You’re dress is beyond beautiful. It’s amazing how far a little hand stitching can go and how many problems it can solve. I know some folks think it’s daunting, but really it (like you said) doesn’t take as long as you think and you don’t have to do mind- and finger-bending circus acts with your sewing machine!
Sarai
June 12, 2012 #
True, there are a lot of problems that hand stitching solves better than any other method. I’ll use my machine for certain things if I can get close to the same result, but you just have so much control doing things manually sometimes.
lee lee
June 12, 2012 #
Thankyou for this tutorial! Do you think this dress would look good with sleeves(like those in the Violet blouse? I would keep the neckline the same.)
Sarai
June 12, 2012 #
You’d have to alter it quite a bit to add sleeves, because it has straps rather than a proper armhole. I’m sure it could be done, it just depends on how much work you want to put in. :)
Alex
June 12, 2012 #
This looks so gorgeous, I love the cream colour! I’m definitely going to give this a try.
xxx
Alex
Anna | Mormor hade stil
June 12, 2012 #
I love this detailed description of your sewing process and methods! Thank you for sharing.
LoriAnne
June 12, 2012 #
I just finish a top with the boarder at the hem line. I wasn’t brave enough for the neck line but thanks to you I am.
francesca
June 12, 2012 #
Thank you! just what I needed! Now I am dying to make my first Hazel :)
I have a question, if you don’t mind – I have some gorgeous black eyelet fabric which is very fine and has lots of holes in it. I was thinking of lining it in a colour – turquoise or pink perhaps – but that would mean no interfacing for the bodice – do you think it would be enough to interface the facings? Otherwise I guess I will have to use black woven interfacing and black lining… which will kind of kill the whole holey effect….
Sarai
June 12, 2012 #
What about underlining the whole thing with a colored fabric, rather than using interfacing? If you chose a light but somewhat stiff colored fabric, it could substitute well for interfacing. On the borders, you could trim it slightly below the scalloped edges, then use the facing method I mentioned to finish the borders on the inside and cover up the raw edges of the underlining at the edges.
francesca
June 13, 2012 #
Thanks Sarai – that is a brilliant idea….
I really appreciate posts like this, and the fact that you take the time to reply to our questions.
Brittany Cole
June 12, 2012 #
OMG! That is a gorgeous dress! So classy and fancy but at the same time wearable for a regular day. Well done. Please don’t be upset if I copy it =)
Doortje
June 12, 2012 #
This dress looks sooooooo pretty!
Sew Little Time
June 12, 2012 #
ohhh, i really have never understood how to match up prints but it has all become clear! thanks for that. the dress is so pretty – hope my hazel looks half as lovely!
Carla
June 12, 2012 #
So THAT’S how you did it! Thanks so much for sharing, the creme fabric is just gorgeous.
Ginger
June 12, 2012 #
This is absolutely gorgeous! I love it so much.
Sarah
June 12, 2012 #
This dress is completely breathtaking!
Maddie Flanigan
June 12, 2012 #
what great tips! I especially thought it was clever how you finished the front neck with a self facing. It adds stability and prevents a headache that would ensue if the lining extended all the way to the top bodice. That would not be fun to attach! Lovely lovely dress!
Yana
June 12, 2012 #
Wow, your Hazel is just stunning! Thank you for the tips on working with scalloped edge fabric. I will definitely try it out and will come back to look at the tips again! Love your work :)
Emily
June 12, 2012 #
Wonderful tips! I will definitely refer to this post if I make something with a beautiful edge like yours.
Pamela
June 13, 2012 #
Thank you for this information b/c I had seen a dress on Princess Kate that she wore for the Diamond Jubillee , it was fully lace but no see thru, I had to reason that they placed nude fabric( nude tricote I wondered?) but had no idea how to proceed to make something close( yes, I LOVED that dress!) Ok this was a simple sheath dress, but in a sheath you have princess lines which then means all French seams?? Has anyone got any further ideas for this,,,,,,,, I have to assume that some sort of interfacing HAD to be used also
I am well aware that her dress was probably couture made, but HOW is the biggest question I have! Same as what you did?? I could see the beauty of all that lace showing thru and someone commented that it did have a nude underfacing whatever that is!
Any ideas ladies?? I think it would look as stunning in black or cream
And yes,, I do want to make a kind of copy of that dress b/c I totally fell in love w/ it and it was SO SO classy looking ,,,,,,,great topic this is just what I need here! TIA for ANY advice!
Sarai
June 13, 2012 #
Pamela, you might want to check out the Susan Khalje book I linked to in the post. She goes into great detail about working with lace! It’s ostensibly about bridal fashion, but has numerous tips for sewing lace, and also creating highly structured garments (with boning, etc). Your local library might also have it, and I believe Susan Khalje now offers a CD or DVD version too.
Amber
June 17, 2012 #
This is beautiful! Thank you so much I always wondered how to work with eyelet and lace edgings, this has opened a whole new world for me!
Janice Bear
June 18, 2012 #
This is lovely! White dresses, eyelet, and summer just go together! Not sure I’m ready to tackle the dress, but maybe a pillow would be a good way to experiment with insetting a border/triangle like in your bodice. Do you think…?
Justine
June 18, 2012 #
I used this same technique from the bridal couture book for a lace border on a wedding gown. Incidentally I just found another copy of bridal couture at the thrift shop for 2 dollars . I was astonished to see the same book online for two hundred dollars. I think it is time for Ms. khalje to do a reprint!
Rosa
June 19, 2012 #
Great article! I just decided to do a top in white eyelet. I’m using the eyelet for the border (it’s a peasant style top) but I did decide to underline with white muslin. I have the pieces cut out but haven’t sewn it up yet. Thanks for the tips.